
To a photographer, 3D can mean so many different things, which isn’t too surprising because our eyes and brains use so many different ways to perceive depth. Much of the information we use – like perspective – is present in ordinary photos, but one important element is missing. That’s something called binocular disparity, and it means that our two eyes see a scene from two slightly different viewpoints. The additional information this provides is processed subconsciously by our brains to enhance the feeling of depth and usually, when TVs, movies, or cameras are described as 3D, it means they provide binocular disparity.
However, you don’t have to buy a special camera to take three-dimensional photos. Here, we’ll show you three different ways of taking 3D photos, and follow this up by looking at how to process them so you’ll be able to view them and experience that ’wow’ feeling.
Introducing Stereo Pairs
Just as having two eyes is a key element of 3D vision, capturing a scene from two different viewpoints is essential for 3D photography. The result is a pair of photos – the left and right eye views – called a stereo pair. But this is just the start. To see depth, you have to view the pair so that your left eye sees only the left-eye image, and your right eye sees only the right-eye image. We’ll look at two ways of doing that later but, to start, let’s see how to capture the images.

The easiest way is to use just an ordinary camera, taking two shots but moving the camera horizontally by about 70 mm – the distance between your eyes – between the shots. It might not give the best results, but do try this out before moving on to more advanced methods. For a camera with an optical viewfinder, like an SLR, hold the camera to your left eye and take a photo, then move it to your right eye and take another. If your camera has an LCD viewfinder, hold the camera securely while looking at the viewfinder, take a shot with your weight on your left foot, then transfer your weight onto your right foot and take another. Whichever method you use, try to keep the camera at the same height and facing in the same direction for the two shots. When you’ve taken a few stereo pairs, you’ll probably want to jump forward to our description of how to process the images, so you can admire your handiwork before backtracking to discover some better ways of capturing stereo pairs.
Using Two Cameras
3D cameras with two lenses are occasionally manufactured, but they’re expensive. However, you can come close by using two cameras side by side. If you buy new cameras, that’ll be expensive, but shopping around for two identical second-hand cameras offers an affordable option. The two cameras need to be mounted next to each other on a rigid support. We suggest using a flash bracket, the type that has two tripod screws, one for the camera and one for an off-camera flash, but use both for your two cameras. So both cameras capture the scene at exactly the same time – important if anything is moving – ideally, you should trigger them both with a remote control. Also, both cameras must be at the same zoom level. So, unless the camera menus allow you to select a zoom level, the only option is to use both cameras at either their minimum or maximum zoom setting.

Another option that gets even closer to a dedicated 3D camera is to build your own. At one time this would have been unthinkable, but with a Raspberry Pi and a couple of Camera Modules, this becomes a possible if slightly ambitious project. You’d probably base it on an ordinary 2D Raspberry Pi camera project, but modifying it by addressing the issue of attaching two cameras to the Raspberry Pi.

Slide Bracket
Next is a solution that requires just a single camera, so it’s going to be cheaper – in fact, you’ll probably use a camera you already own. Really it’s just a more sophisticated version of the simple approach of moving the camera between your two eyes. It’s not going to work if the scene contains moving objects, but it’s a really simple method. Without some additional hardware, taking two photos with the same camera risks the framing of the scene changing between shots. The software we’re using can correct this sort of error, but for best results, it’s good to get them as close as possible when you take the photos. You can buy slide rails that you attach to a tripod before attaching the camera to the rail, so you can slide the camera horizontally, remaining at the same height and pointing in the same direction.

Our solution is similar, although it’s much easier to make. We call it a slide bracket, and looking at the photo (Figure 1) will be enough for you to figure out how to build and use one. We made ours from chipboard, gluing and screwing the joints, and embedding a tripod socket in the base. Ideally, to eliminate any possibility of scratching your camera when you slide it, we recommend gluing some fabric such as velvet to the inside surfaces of the base and the back of the bracket.
Mirror Rig
Our next method uses only one camera, and the two shots are captured at exactly the same time, so it’ll work with moving objects. It might seem to offer the best of both worlds, although there are drawbacks. Even so, if you get bitten by the 3D bug, this is surely something you’ll want to try, but we’d have to call it experimental.

The method involves taking a single photo while holding a mirror to the side of the lens and almost perpendicular to the camera. Assuming the mirror is to the left of the lens, the resulting photo has a horizontally mirrored version of the left-eye image on the left, and the right-eye image on the right. The drawback is that each image appears in only half of the full frame. Also, it captures part of the scene that doesn’t appear in both images, so the useful area of each is a square or tall thin rectangle. For some subjects this is fine – but not, for example, with most landscapes.
Rather than holding the mirror by hand, you’ll need to fix it in place. The exact arrangement of the rig will depend on your camera, and you’ll have to fine-tune the size of the mirror, the horizontal separation between the mirror and the camera, and how much the mirror’s far end is angled inwards. However, our photos should provide a good starting point. For your initial tests, use acrylic (Perspex) mirror material because it’s easy to cut. You’ll notice, though, that you’ll get quite bad ghosting in the reflected image which, at best, causes a lack of sharpness. So, having determined the size that you’ll need using ordinary acrylic mirror material, if you want to go further, you should buy something called first surface mirror (or front surface mirror), which has the reflective coating on the surface, not behind the glass or acrylic, thereby preventing ghosting. Acrylic first surface mirrors are available, but they cost more than ordinary mirrors, and it’s easy to damage the reflective layer. To keep the mirror rigid, and for ease of fixing, we attached it to plywood, with a non-solvent adhesive. Keep the weight of the backing material to a minimum to prevent the mirror sagging at the far end, especially if you’re using a large mirror or a long arm, as we did. We built the supporting structure from angled, perforated aluminium strip, using machine screws and nuts to fix it all together, and short wood-screws to attach the plywood to the framework. The mirror rig and camera are connected together using a flash bracket. We found, when using an SLR, that the rig is best for reasonably close-up subjects, but at longer range, it doesn’t make especially good use of the sensor area. Our tentative tests with a compact camera suggested that it’s better than an SLR with longer-range subjects.

Processing Stereo Pairs
All the processing can be done using the free StereoPhoto Maker. It can even flip the reflected image taken with the mirror rig at Edit > Rotate/Flip Image > Horizontal flip (left). Also, although it’s better to get as much right as you can when you take the stereo pair, it will also correct any discrepancies between the two shots (Adjust > Auto Alignment), including the distortion in the reflected image caused by a mirror rig, and it prepares the stereo pair for 3D viewing. There’s plenty of good documentation, so you’ll easily learn how to use it, but we’ll introduce you to a couple of the display options that StereoPhoto Maker supports.

First up is ‘Side-by-side’ images, which is exactly what it sounds like: the left and right images displayed side by side for printing or on-screen display. Surprisingly, this allows you to view the scene in three dimensions, and it’s easiest if they’re the correct size. It requires some practice, but if you can view Magic Eye images, then you’ll be able to view a Side-by-side stereo pair. And if you haven’t acquired the knack, there’s no shortage of tutorials online. Actually, there are two forms of side-by-side viewing, and they require different preparation and viewing techniques, so read up on both parallel and cross-eyed viewing. As an alternative to free-viewing, you can buy stereoscopes – simple optical devices that let you view a stereo pair if you don’t have the knack to do so without – and some will work with larger images.

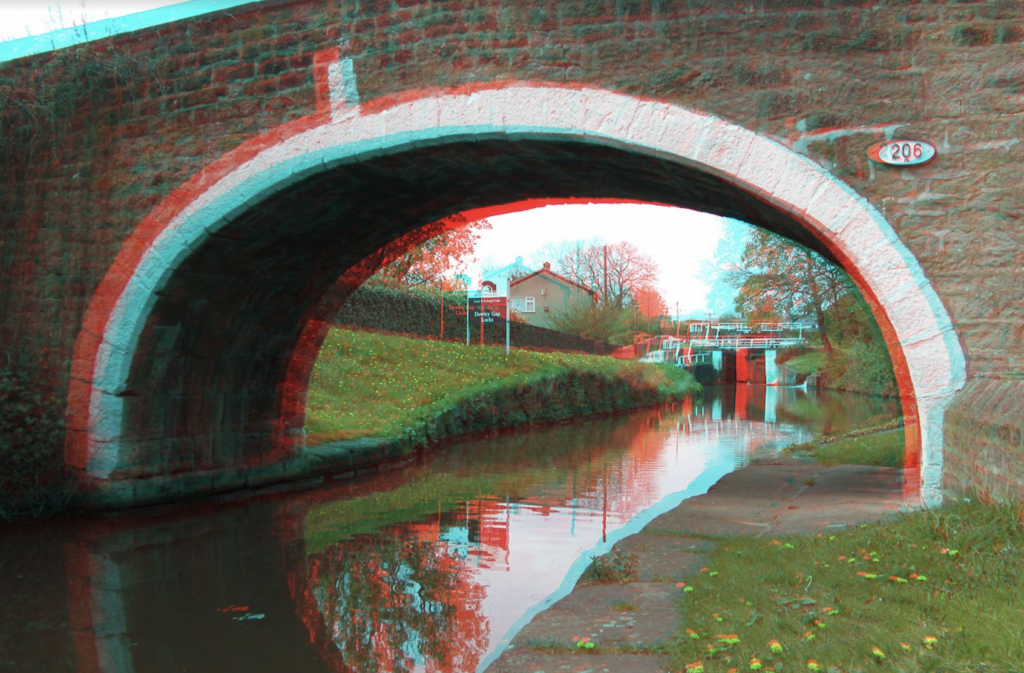
There’s an alternative way of processing and viewing a stereo pair that doesn’t need visual gymnastics or buying viewing equipment. It’s called an anaglyph, and it comprises the red component of the left-eye image superimposed on the cyan component of the right-eye image. Because red and cyan, between them, allow all colours to displayed, the result has approximately the correct colours, although some objects will have red and cyan fringes. Not very promising, you might think, but don a pair of red/cyan glasses and all this changes. Because the red lens allows red light to pass but blocks cyan light and vice versa, each eye sees only the image intended for it and, hey presto, you’ve got a 3D image.


